Introduction
This post introduces a new model for a path drawing (pen) tool, with a particular focus on font design.
Although this tool works much like familiar pen tools (which are based on the manipulation of Bézier curves), it is actually based on a new family of two-control-point curves, which we’ve been calling the hyperbezier.
This work is still in its early stages, and the demo below is quite barebones; my goal here is to get a simple version of this tool into the hands of designers and design-tool makers, so that more people can start to play around and evaluate it.
Contents
Background & motivation
The basis of this tool is a new mathematical model for fitting a curve to a set of points; that work was done earlier in the year by my collaborator Raph Levien. For the past year or so Raph has been excitedly talking to me about about things like splines and G2 continuity and the elegance of the Euler spiral, and I have for the most part been smiling politely and nodding. In the last few weeks however I have started trying to implement a simple drawing app around his new model, and the excitement is catching: this new tool feels like the first I have used that is a compelling alternative to traditional Bézier-curve based drawing tools.
It is likely that if you have ever used a computer drawing application then you have, at some point, used a pen tool: a tool that allows you to place a small number of points, which are then connected with a series of curves, the exact curvature being a function of the position of the points.
Tools like this— which take some fixed number of points and calculate a curve based on them— are called splines. If you are curious about the topic (particularly in the context of interactive design tools), a very accessible overview is Raph’s dissertation; I won’t go into too much detail here, except to say that Raph has been revisiting this subject recently, and the result is the hyperbezier spline. Like traditional (cubic) Bézier paths, a hyperbezier path is comprised of segments, each defined by two on-curve and two off-curve (or control) points; the curve passes through the two on-curve points, and the curvature itself is determined by the position of the two off-curve points.
If you’re generally curious about Béziers, A Primer on Béziers Curves is an excellent resource. For our purposes it is enough to note that splines based on direct manipulation of Bézier control points (most pen tools) provide a high degree of control, but are difficult to use well. In particular, it can be tricky to maintain consistent curvature between adjoining segments of a path, which can lead to a ‘lumpy’ look; the following example is contrived, but in practice consistently getting smooth feeling curves with Béziers is challenging.
The hyperbezier
The core idea of the hyperbezier is the use of auto-points. These control points are adjusted automatically by the tool in order to maintain a smooth curve between neighbouring curve segments.
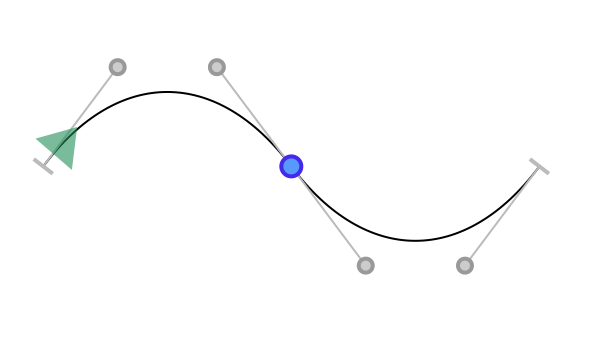
Let’s look at an example. With the path below you can drag points around, and double-click points to toggle their type.
The two green squares are corner points; curve segments that join at these points are allowed to change direction sharply. The two blue circles are smooth points; changing the curve on one side of the point can cause changes in the auto points (and hence the curve) on the other side.
The auto-points are indicated with dashed lines and terminating ‘x’s. The manual control points are indicated with solid lines, and terminating ‘o’s.
Playing around
To get a better understanding of the spline’s behaviour, here are some things to try (this requires a mouse):
- double-click the bottom point to make it smooth. When this point is smooth, the auto points beside it are adjusted so that the two curve segments join smoothly.
- reset, or double-click the bottom point to turn it back into a corner. Now doubleclick the top-left smooth point. Making the top-left point a corner will replace the curve between them with a straight line. Two adjacent corners with only auto-points between them will always form a straight line, because a line is maximally smooth.
- You should notice two small ‘x’s on this line. Drag one of these auto points somewhere to position it manually. You will notice that the remaining auto-point is repositioned as you drag.
- Drag the other auto-point. With both control points positioned manually, and with corners at either end, you have full control of this segment.
The toy pen tool
If you’re curious to try drawing with this tool, There is a simple web app available here (and embedded below).
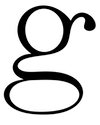
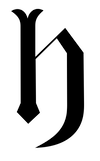
Below are some examples of letterforms I’ve sketched in the process of getting this working. These may offend the actual type designers in the room, but I hope they will be useful illustrations.


Using the toy pen tool
The toy is very rough: you have a select and a pen tool, but there are no rulers or measurement tools, no transforms, no ability to select multiple points. The pen works much like the familiar Bézier pen:
General:
Vkey sets selection (arrow) tool,Pkey sets pen tool- holding the space bar hides UI and shows filled path
- the current drawing is stored as part of the URL; copy this somewhere to “save”
Pen tool:
- click to add a line segment ending in a corner point
- alt + click to add an automatic curve segment ending in a smooth point
- click + drag to add a curve segment ending in a smooth point, with a manual control point
- click on a line segment to insert a point there; alt makes it a smooth point
- alt + click on any existing point to toggle the type of that point
Select tool:
- drag a control auto-point to move it, converting it to a manual point if necessary
- double-click will toggle an on-curve point between smooth and corner
- alt + click on a line segment to add two auto points
- deleting an off-curve point makes that curve segment into a line segment
- arrow keys nudge the current selection by 1 px; adding shift makes it 10px, and ctrl/cmd makes it 100px.
- shift + any of the above moves all of the points in the current outline (I’m sorry)
Next steps
The code for the spline, including the demo, is open source and available on github.
The intent of this demo is twofold: firstly to test out how the curve feels to use, and to start playing around with the UX of the pen tool, and secondly to share this research with the broader community of designers and design-tool creators. Although this work is quite rough, my personal feeling is that this spline shows tremendous promise. Anecdotally, as a mere casual user of design tools, I find it significantly easier to make good looking curves with the hyperbezier than I do with traditional Bézier pen tools.
Perhaps the biggest question will be figuring out the best interaction model: what set of mouse clicks, key presses and modifiers the user issues in order to control the state of the points. This has been a challenge for other new splines; the interaction model we use with Béziers is familiar and long-established, and people (especially graphic designers) are deeply comfortable with it. The interaction model used here for the hyperbezier is intentionally designed to feel similar to these existing tools, but other interaction models may be worth exploring.
In the coming weeks I hope to integrating the spline into Runebender, a font editor, which will provide a much richer editing experience and will let us better explore how well the spline is suited to real-world use. In addition, Raph intends to do a more detailed writeup of the spline itself and the associated math, which derives both from the earlier Spiro spline and the classic model of elastica under tension.
If you’re curious about the spline, there are more details in the github repo; if you have questions you can open an issue there, ask them in our zulip chat server or reach out on on twitter.
Thanks
This work was funded by Google Fonts.